Connecting to the car
OBD2 port pinout for pre-AP Model S, chassis CAN availability, the retrofit harness when pins are missing, and the connection adapter.
Updated June 11, 2026
NAP communicates with the car over CAN bus. On pre-AP Model S, the connection point is the OBD2 port in the driver footwell. Understanding which CAN buses that port exposes — and whether yours has them — is the first step before anything else.
The OBD2 port location
The OBD2 connector is on the underside of the dash in the driver footwell, near the door side. It's close to the ceiling of the footwell, somewhat tucked toward the outside of the car.
CAN buses on pre-AP Model S
The pre-AP Model S has six regular CAN buses plus one EtherCAN. Two of those buses are relevant to NAP:
- Powertrain CAN (CAN1) — carries drive unit, battery, charging, and thermal messages. This bus is always present at the OBD2 port.
- Chassis CAN (CAN0) — carries EPAS (steering), EPB (parking brake), TPMS, suspension, and steering wheel controls. This is the bus NAP needs for steering. Not always present at the OBD2 port depending on build date.
The full CAN layout is documented at /reference/tesla-can-bus.
The OBD2 pinout and the chassis CAN problem
Standard OBD2 uses pin 6 for CAN High and pin 14 for CAN Low of the primary bus (ISO 15765-4). Tesla uses those for powertrain CAN but also routes chassis CAN to pins 1 and 9 — which are not part of the standard OBD2 spec and were left unpopulated in some early build runs.
| Pin | Signal | Notes |
|---|---|---|
| 1 | Chassis CAN High | Not populated on some early builds |
| 4 | Chassis ground | Always present |
| 5 | Signal ground | Always present |
| 6 | Powertrain CAN High | Always present |
| 9 | Chassis CAN Low | Not populated on some early builds |
| 14 | Powertrain CAN Low | Always present |
| 16 | 12 V power | Always present |
Pre-AP cars built before approximately May 31, 2013 have only one CAN bus at the OBD2 port (powertrain CAN only). Cars built after that date typically have both buses. However, "typically" is doing work there — the presence of pins 1 and 9 varies by build date and configuration, and you need to check your specific car.
Checking whether your port has chassis CAN
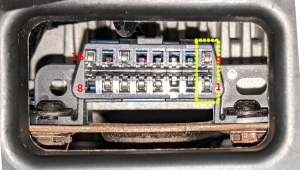
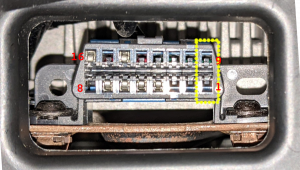
Pull the OBD2 connector out of its bracket (two screws hold it in place — they are awkward to reach). Look at the connector face and check whether physical pins are present in positions 1 and 9. If they're populated with metal contacts, you have chassis CAN at the OBD2 port. If those positions are empty, you don't.
Taking a photo and comparing to reference images is the easiest way to confirm.
The chassis CAN retrofit harness
If your OBD2 port is missing pins 1 and 9, you need to add them before NAP can see the chassis CAN. The solution is a short two-wire harness that taps chassis CAN from the Tesla diagnostic port located under the center console display (CID), then adds the two pins into your existing OBD2 connector.
The Tinkla chassis CAN retrofit harness (sold separately; see the community Discord for current sources) is the established solution. Installation involves:
- Remove the driver footwell cover to expose the OBD2 connector.
- Free the OBD2 connector from its bracket.
- Use a small flat-head screwdriver to release the two blue retention tabs on the connector shell, insert the new pins (red wire to pin 1, black wire to pin 9), and reseat the tabs.
- Remount the OBD2 connector.
- Route the other end of the harness to the Tesla diagnostic port under the CID. Access it by pulling down the small shelf below the display, or sometimes from the side after removing the footwell cover.
This is a permanent wiring change to the car — after installation, chassis CAN is available at the OBD2 port as if it had been there from the factory.
If you're also installing the Comma Pedal, do both at the same time since you'll have the footwell disassembled anyway.
The connection adapter
Whatever you connect with has to do three jobs: power the comma device from OBD2 pin 16, route both CAN buses (powertrain and chassis) to the panda inside the device, and expose an extra CAN connection if you're adding a Comma Pedal or radar.
The proven unit for this is the Tinkla OBD-C adapter — a compact box that plugs into the OBD2 port and presents an OBD-C (modified USB-C) port for the comma device, plus an RJ45 port for the Comma Pedal, a USB-A port for accessories, and JST 2.54 mm connectors for CAN0, CAN1, and CAN2. It was developed during the Tinkla era and works with NAP on current comma hardware.
You can buy it as part of the Model S preAP kit at xnor.shop. The full technical detail, including the schematic, is preserved at /history/eon-era-hardware, and Discord is the place for questions before you order.
Do not substitute a generic OBD2 splitter or diagnostic dongle — they don't route the chassis CAN pins or carry the power the device needs.
CAN bus assignment summary
| Bus | Connection | Used for |
|---|---|---|
| CAN0 (chassis) | Via OBD2 pins 1 / 9 | EPAS steering, SCCM stalk, EPB |
| CAN1 (powertrain) | Via OBD2 pins 6 / 14 | Drive unit, speed, pedal module |
| CAN2 | Adapter expansion connector | Comma Pedal or Bosch radar |