EON-era hardware
Archive of the pre-comma-three hardware stack used in Tinkla installs — EON, Panda generations, Tesla Giraffe, EPAS harness, SoftPanda, OBD-C adapter, and Tinkla Relay.
Updated June 11, 2026
This page documents hardware used in the Tinkla project era and is not part of a current NotAutopilot install. The current NAP hardware stack is described in the hardware section. Some of this equipment is still in active use on older installs, so the technical detail is preserved here for reference.
This is a tour of the hardware stack as it existed from the early Tinkla days (2018) through the transition to comma three. It covers each component in roughly the order an installer would encounter it.
EON and EON Gold
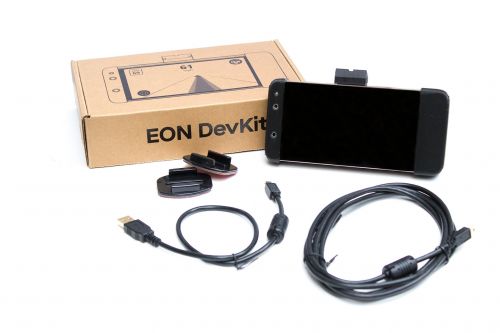
The EON was the windshield-mounted compute device used before the comma two and comma three. Comma.ai sold it for $599 USD. It was based on a Qualcomm Snapdragon 821 mobile SoC — the same chip found in phones like the OnePlus 3T and LeEco LePro3. Community members sometimes built their own "FrEON" (free EON) using those phones with a 3D-printed mount.
The EON connected to the Panda via USB and ran openpilot software directly. Because the Snapdragon ran hot under continuous compute load, some owners replaced the stock fan with a quieter Noctua unit ($15, two wire solder). Keeping the screen off helped thermal management as well — about 15°F cooler under load.
EON Gold and EON support cutoff
EON Gold was a later revision. The original EON was not supported in the Tesla Unity branch and could only run old versions (v0.6.6 and v0.7.4). EON Gold with a black Panda was the minimum requirement for v0.8.13-31 (March 2022).
Comma.ai ended support for Comma two and EON Gold in April 2022. Releases from v0.8.13-38 onward were built for comma three only. The Tinkla wiki noted that a maintenance build would continue for those devices, but new features were comma three only from that point forward.
For a fresh install today, EON and EON Gold are not viable. The comma 3 or 3X is the current device — see /hardware/comma-device.
Installing the EON
EON mounting required care to get the device level and centered. The standard method used masking tape to mark the exact horizontal center of the windshield from both sides and a third reference point at a third of the height, then aligned a GoPro-style adhesive mount to those marks before pressing it permanently. The USB and GPS antenna cables were routed up the A-pillar under the airbag cover and tucked into the headliner across to the mirror base.
Software setup after hardware install:
- Set up stock openpilot on the EON per the official comma instructions
- SSH in and clone the Tinkla fork:
git clone --depth 1 https://github.com/BogGyver/openpilot.git -b tesla_0.6.6 /data/openpilot - Reboot (first boot takes ~20 minutes)
- Edit
/data/bb_openpilot.cfgto set your handle andforce_fingerprint = True - Set
use_tesla_gps = Trueif using a white Panda (grey Panda has built-in GPS) - Flash the Panda with the Tesla fork firmware (see Panda section below)
White, grey, and black Panda
The Panda was comma.ai's OBD2 CAN interface dongle. It supports three CAN buses, two LIN buses, and GMLAN. For Tesla use, the Tinkla firmware heavily modified the stock Panda code to emulate DAS messages and keep the Bosch radar talking.
CAN bus assignments on Tesla installs:
- CAN0 — Tesla chassis CAN
- CAN1 — Bosch radar
- CAN2 — Tesla EPAS (electric power steering)
White Panda ($99)
WiFi and USB capable. Could be used directly with Cabana on a laptop for CAN analysis. No built-in GPS.
Grey Panda ($199)
High-precision GPS for map integration. No WiFi; could not be used with Cabana directly.
Boggyver used both: grey for daily driving, white for CAN reverse engineering with an OBD2 splitter.
Black Panda
The black Panda was the internal Panda equivalent integrated into comma two and comma three devkits — similar hardware to the original standalone units but built into the device. From v0.8.13-31 onward, EON Gold with a standalone black Panda was the minimum external-Panda configuration. The comma two and three had the equivalent built in.
Panda flashing required SSH into the EON while the car was in the "Car Off" state with the Panda connected to the Giraffe/harness:
cd /data/openpilot/panda/board
killall boardd
make clean
make && sleep 1 && (make recover || make recover) && echo Success! && sleep 2 && reboot
From v0.8.13-31 onward, panda flashing was built into the device UI and no longer required SSH.
Tesla Giraffe
The Tesla Giraffe is no longer needed with the current Tinkla software (from v0.8.13 onward it was replaced by the Tinkla OBD-C adapter). This section is for reference if you're maintaining an older install.
The Tesla Giraffe rev. B was a PCB created and sold by community member appleguru. It plugged into the OBD2 port under the driver's footwell dash and provided the right CAN connections between the Panda and the Tesla's chassis, EPAS, and radar buses.
CAN select and EPAS switching
The Giraffe had a CAN select line driven by the Panda's GMLAN output. When that line was high (yellow LED D1 lit), the J6 EPAS output carried Panda CAN3 — the openpilot steering commands. When low (green LED D1 lit), J6 carried the chassis CAN from the car, effectively reconnecting the EPAS to its normal bus. This meant the EPAS fell back to normal power steering if the Panda was removed or unplugged.
J7 RJ45 Comma pinout
| RJ45 pin / 568B color | Function |
|---|---|
| 1 / Orange-White (+ shield) | GND |
| 2 / Orange | Fused +12V |
| 3 / Green-White | EPAS CAN− |
| 4 / Blue | No connection |
| 5 / Blue-White | GND |
| 6 / Green | EPAS CAN+ |
| 7 / Brown-White | CAN2+ (radar) |
| 8 / Brown | CAN2− (radar) |
J8 RJ45 GPIO pinout
| RJ45 pin / 568B color | Output function |
|---|---|
| 1 / Orange-White | OUT3 (brake lights) |
| 2 / Orange | OUT1 (front camera switch) |
| 3 / Green-White | OUT4 (left turn signal) |
| 4 / Blue | OUT2 (drive) |
| 5 / Blue-White | OUT5 (right turn signal) |
| 6 / Green | OUT6 (reverse) |
| 7 / Brown-White | Fused +12V |
| 8 / Brown (+ shield) | GND |
OUT8 ("ignition" power) was used to drive the relay for Bosch radar power.
Useful part numbers
- 2-pin JST connectors (J2/J3/J6): JST 2-pos 2 mm PH header, PN
B2B-PH-K-S(LF)(SN) - Fuse F1: 3A blade automotive fuse, Littelfuse
0287003.PXCN - J1 optional terminal block: Phoenix Contact
1827787(plug) /1827949(header) - J9 connector: Phoenix Contact
1827703
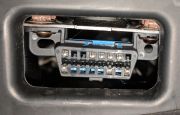
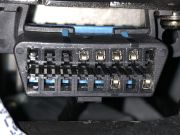
Car compatibility note
Cars built after May 31, 2013 have chassis CAN on OBD2 pins 1 (CH+) and 9 (CH−). Cars built before that date are missing those pins and needed a "TDC connector" variant of the Giraffe that added a second connection point under the MCU.

EPAS harness era
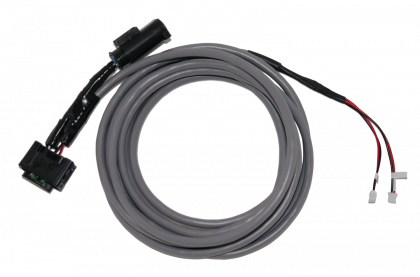
Before the Tinkla OBD-C adapter existed, connecting openpilot to the EPAS required a custom wiring harness. This meant opening the frunk, running wires through the firewall, and tapping the EPAS connector in the engine bay — roughly a half-day job on first attempt.
What the harness connected
The EPAS column on pre-AP Model S has a JST2 connector carrying the CAN+ and CAN− lines. The harness ran from that connector through the firewall and into the driver's footwell where it terminated at the Giraffe or Panda's CAN2 input.
Cable requirements
Use twisted-pair cable, ideally shielded, for the EPAS CAN lines. Belden 8723 060-U500 was the recommended choice. Do not use generic untwisted hookup wire — CAN bus is noise-sensitive and a long unshielded run in an engine bay will cause problems.
Routing through the firewall
The standard route went under the washer fluid reservoir, through the first hood metal support frame, into the gap between the frame and body, then out next to the door seal into the cabin. The cable was fished from the frunk side and pulled through from the cabin side, then routed behind the driver's footwell kick panel to the OBD2 port area.
Solder the JST2 connector after fishing the wire through — solder joints on JST2 pins do not survive being dragged through a narrow firewall gap.
Testing before connecting
Before plugging into the car:
- Short check: pin spare pins into positions 2 and 5 of the JST2; if you get continuity between them the connector has a short.
- Continuity check: jumper the JST2 plug end and measure between pins 2 and 5 at the Giraffe end; if open, there is a broken connection.
If the car shows "Power Assist not available" after connecting, the CAN+/CAN− polarity is reversed — swap the pins in the JST2 connector.
A-pillar harness (later option)
For cars manufactured after July 2014, a simpler A-pillar harness was available from community vendors (EV Cables / Flyboy222pa on eBay). This harness installed in minutes by removing the A-pillar cover (one screw) rather than opening the frunk. It also simplified adding the Bosch radar.

SoftPanda
SoftPanda was a software-only approach to instrument cluster integration that predated the Tinkla Buddy. It required root access to both the CID (central infotainment display) and IC (instrument cluster).
The core binary ran on the CID and acted as an EtherCAN proxy between the MCU and IC, intercepting packets and rewriting them to inject DAS-style data from openpilot. The IC would switch to the AutoPilot visualization mode — same path visualizations, lead car indicators, engagement status.
Config file requirements (openpilot side):
enable_das_emulation = True
has_tesla_ic_integration = True
use_tesla_map_data = True
Changes required on the IC (add to the IC startup file):
/bin/mount | /bin/grep -c /var/root/lang/QtCar >/dev/null || /bin/mount --bind /var/root/lang/QtCar_en.qm /usr/tesla/UI/bin/QtCar_en.qm
QCPORT=":20201"
export QCPORT
QCHPPORT=":31515"
export QCHPPORT
Changes required on the CID (same four lines, but do not declare QCHPPORT on CID):
/bin/mount | /bin/grep -c /var/root/lang/QtCar >/dev/null || /bin/mount --bind /var/root/lang/QtCar_en.qm /usr/tesla/UI/bin/QtCar_en.qm
QCPORT=":20201"
export QCPORT
CID menu integration (showing openpilot settings in the Tesla UI) was only supported on firmware 2019.4.2 and below. Tesla software 2019.16 required the -fix1916 flag for the EtherCAN proxy.
When things went wrong, both IC and CID would show black screens. The recovery was to reboot the CID from the steering wheel (hold both scroll wheels) and wait for softPanda to restart. The lock file mechanism prevented rapid restart loops.
SoftPanda was effectively superseded by the Tinkla Buddy once Tesla made root persistence difficult to maintain. The Tinkla wiki included a prominent warning: "Before attempting integration with SoftPanda, have you considered trying Tinkla Buddy?"
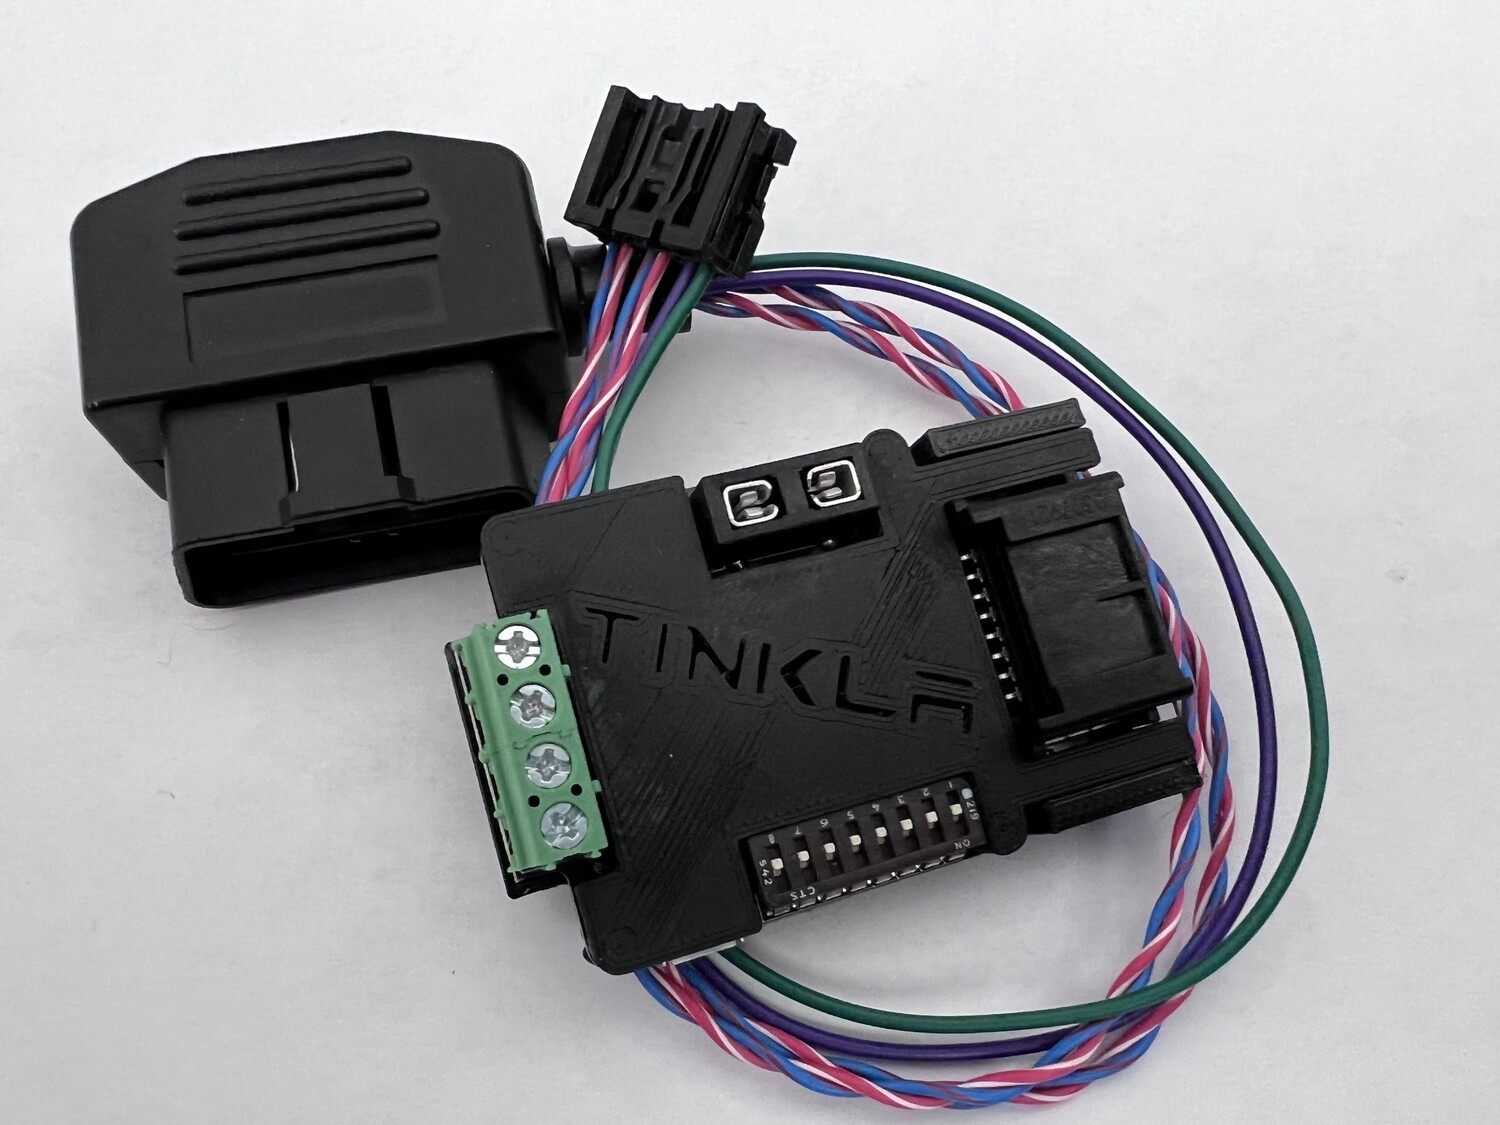
Tinkla OBD-C adapter (pre-AP)
Starting with v0.8.13-31 (March 2022), the Tinkla OBD-C adapter replaced the EPAS harness for pre-AP cars. It turned a multi-hour frunk teardown into a plug-in operation.


Connectors
| Port | Purpose |
|---|---|
| OBD2 connector | Plugs directly into the driver's footwell OBD2 port on pre-AP Model S |
| OBD-C port | Thunderbolt3/USB4 cable to comma devkit — carries +12V, GND, and 3 CAN buses. Not a standard USB-C port. Do not plug other devices here. |
| RJ45 for pedal interceptor | Comma Pedal connection using a standard CAT5/6 Ethernet cable. Not a standard Ethernet port. |
| USB-A port | 5V/2A power output for Tinkla Buddy |
| JST2.5 — CAN0 | Chassis CAN breakout for accessories |
| JST2.5 — CAN1 | Bosch radar connection; includes 120 Ω CAN termination |
| JST2.5 — CAN2 | Pedal interceptor (if not using RJ45 port) or other CAN2 accessories; includes 60 Ω termination |
The CAN bus assignments inside the adapter matched the old Giraffe assignments: chassis CAN on CAN0, radar on CAN1, EPAS on CAN2.
Compatibility
The OBD-C adapter worked with comma two, comma three, and EON Gold with black Panda. The OBD-C port carried the same pin assignments as the comma harness connector, so from the devkit's perspective the adapter looked identical to any other OBD-C connection.
AP1 and AP2 variants of the OBD-C adapter existed as separate products — those are covered on the AP1/AP2 teslas page.
Tinkla Relay
The Tinkla Relay was a standalone accessory controller board, not part of the openpilot install itself. It listened on the Tesla chassis CAN (or Powertrain CAN on Model 3/Y) and controlled up to four relay outputs based on car state and steering-wheel button combinations.
The board had eight DIP switches. Switches 1–4 selected one of sixteen pre-programmed trigger logic combinations. Switch 5 kept relay state when the car shut off. Switch 6 enabled AutoPilot Extended Functionality (AutoResume and AutoAdjust Speed Limit). Switches 7–8 were reserved and should be left off.
Virtual buttons
The four virtual buttons were activated by double-pressing specific steering wheel buttons within 0.75 seconds:
| Virtual button | Model S/X button | Model 3/Y button |
|---|---|---|
| Button 1 | Menu Command | Right wheel tilt left |
| Button 2 | Voice Command | Right wheel tilt right |
| Button 3 | Right wheel | Right wheel |
| Button 4 | Left wheel | Left wheel |
AutoPilot extended features
With Switch 6 on:
- AutoResume: after a steering override disengages AutoPilot, the Relay would re-engage it automatically once turn signals were off, the steering angle settled, and ACC was still active — without requiring a stalk tap.
- AutoAdjust max speed: the Relay watched for speed limit changes that AP recognized and immediately adjusted the set speed to match (with the configured percentage offset for Model 3/Y).
Model S/X connector
Direct hardwire connection used a Molex 34791-0080 8-pin connector:
| Pin | Use | Connects to |
|---|---|---|
| 1 | CAN1 Low | Chassis CAN Low |
| 2 | CAN1 High | Chassis CAN High |
| 3 | Not used | — |
| 4 | CAN2 Low | Not used on S/X |
| 5 | CAN2 High | Not used on S/X |
| 6 | Not used | — |
| 7 | GND | Car ground |
| 8 | 12V | Accessory or permanent power |
Firmware updates were applied through a Chrome-based web flasher at https://relay.tinkla.us.
The Relay also functioned as a Cabana CAN sniffer: connecting it to a laptop via USB and opening Cabana with tesla_modelsx.dbc showed live chassis CAN messages. The Relay had to be power-cycled after Cabana use to restore normal functionality.
Putting it all together — the pre-OBD-C stack
A complete early Tinkla pre-AP install looked like this:
- EON on windshield → USB → white or grey Panda
- Panda → OBD2 → Tesla Giraffe rev. B in driver's footwell
- Giraffe → hand-made EPAS harness → through firewall → EPAS JST2 connector in frunk
- Giraffe CAN2 → optional Bosch radar (in front bumper area)
- Giraffe Comma RJ45 → optional Comma Pedal (inline with accelerator pedal connector)
- SoftPanda on CID (if root was available) or Tinkla Buddy (if not) for IC display
- Settings configured over SSH into the EON
From March 2022 onward, steps 2–3 were replaced by the Tinkla OBD-C adapter, SSH setup was replaced by the on-device UI, and the EON was replaced by comma three.