Tinkla Buddy
Archive page for the Tinkla Buddy instrument cluster integration device — MCU1 only, hardware MITM, no longer purchasable.
Updated June 11, 2026
This page documents the Tinkla Buddy device for the historical record. Tinkla Buddy is no longer sold or supported and is not part of a current NotAutopilot install. For the current NAP install, see /getting-started/install.
What the Tinkla Buddy was
Tinkla Buddy (originally called rPanda) solved a specific problem: how to display openpilot path and lead-car data on the Tesla Model S instrument cluster without needing root access to the car's internal computers.
The earlier solution, SoftPanda, required SSH access to the CID and IC and involved modifying system files. When Tesla made root persistence harder to maintain on MCU1 hardware, that approach became fragile. Tinkla Buddy took a different route entirely — hardware man-in-the-middle.
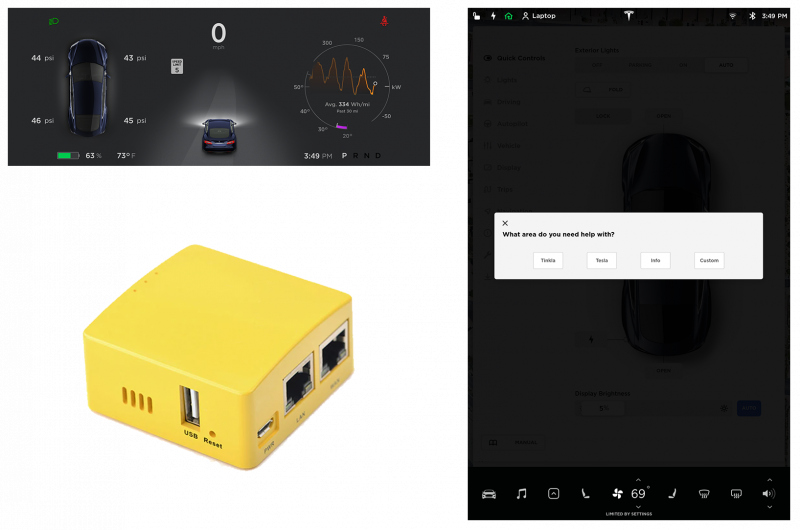
The device sat physically between the MCU1 and the instrument cluster on the EtherCAN link. The MCU1 believed it was talking directly to the IC; the IC believed it was talking directly to the MCU1. The Buddy intercepted every packet in both directions and rewrote whatever it needed to in real time. The MCU never knew it was there. The effect was that the IC would switch to the AutoPilot display mode and show openpilot lane markings, detected cars, and engagement status — the same API Tesla used for factory AutoPilot visualization.

MCU1 only — why MCU2 never worked
The Buddy worked because MCU1 (Tegra-based, found in most Model S built through roughly 2018) used EtherCAN: CAN bus data transported over a physical Ethernet link between the MCU and IC. The Buddy intercepted that Ethernet link.
MCU2 (Intel-based, found in cars after the MCU2 retrofit option became available) communicates differently between MCU and IC. The EtherCAN intercept point does not exist in the same form, and the Buddy's architecture did not translate. No MCU2 solution was ever released.
The install kit
The hardware shipped as a kit containing:
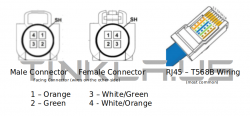
- RK3328-based single-board computer with dual gigabit Ethernet ports, 1 GB RAM
- 32 GB high-endurance SD card, pre-imaged with Tinkla Buddy software
- RJ45 barrel (used to bypass the Buddy if needed)
- 2.4/5 GHz dual-band USB WiFi adapter
- Two Fakra-to-RJ45 adapter cables (the IC network cable uses Fakra connectors; the Buddy used standard RJ45)
- USB-A power cable (compatible with the USB-A port on the Tinkla OBD-C adapter)
Kit cost was approximately $200 USD. The software ran on a yearly subscription tied to the car's VIN: $150 for the first year, $100 to renew each subsequent year. A 14-day free trial started on registration.
Installation outline
The hardest part of installing the Buddy was running a constant 12V power supply to it. Cars with the Cold Weather package had a fuse box near the accelerator pedal that made this straightforward. Cars with a 2016-or-later passenger-side kick panel fuse box needed a re-crimp on the 12V wire — roughly an hour of work. Earlier cars without either option required fishing a wire through a firewall grommet behind the washer fluid reservoir in the frunk, which could take one to two hours. If the car had a Tinkla OBD-C adapter installed, that adapter's USB-A port supplied 5 V/2 A and simplified the power question considerably.
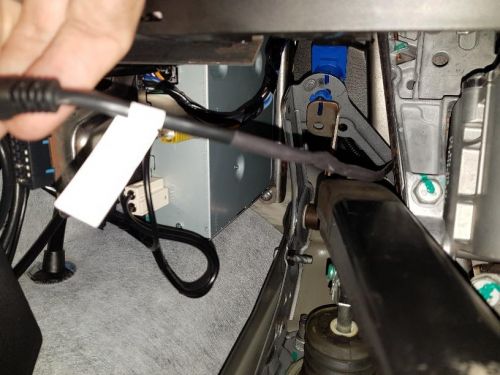
The network connection required removing the instrument cluster to access the Fakra cable on its back panel. Two short CAT5e/CAT6 cables (2–3 ft each) ran through the Fakra-to-RJ45 adapters and connected to the Buddy's WAN and LAN ports:
- WAN port → to the cable coming from the MCU/car side
- LAN port → to the IC itself


After physical connections, the Buddy initialized on first power-up by contacting the Tinkla server to fetch certificates. That process took about 20 minutes, during which the device rebooted several times. Two flashing green LEDs and one red flashing LED indicated a successful initialization.
Removing the instrument cluster on the Model S involved:
- Pulling the knee-board trim below the IC and steering wheel (held by pegs, start at the right side near the hazard button)
- Removing the small trim piece above the steering wheel (two screws underneath)
- Removing the thin plastic panel on the sun guard above the IC (four pegs)
- Removing the silver IC shroud using an inflatable pry bar (AirShim) — and making sure the screw in the side hatch panel was removed first
- Removing the two AC vent trim pieces to reach the final two IC mounting screws
Tools: AirShim inflatable pry bar, plastic trim removal tools, TORX T20 screwdriver.
Configuration
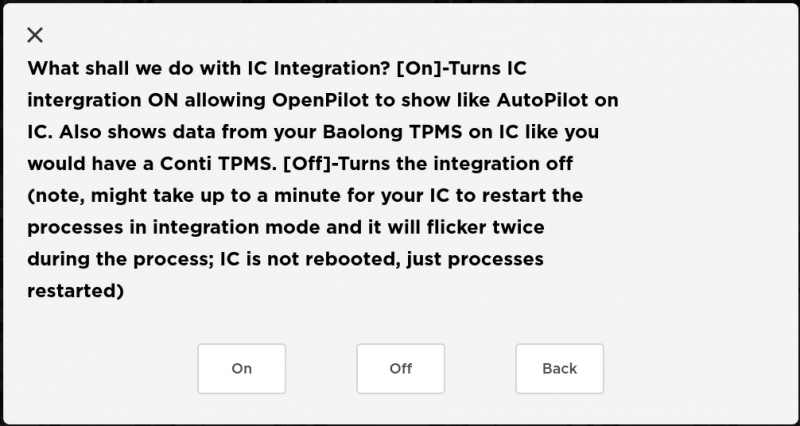
Once running, openpilot IC integration required setting enable_das_emulation = True in the openpilot config file. The IC would then do a soft process restart and switch to the AutoPilot display view.
The Tinkla Menu was accessible by pressing the steering wheel menu button four times (or, when parked, pressing the parking brake four times). It appeared as an overlay on the MCU1 CID touchscreen.
Main menu sections:
| Menu | Function |
|---|---|
| Buddy → Restart / Reboot / Update / Quiet | Process control; Quiet mode silenced the device for service center visits |
| Wifi → Info / IC Int. | Showed WiFi AP credentials; toggled IC integration on/off |
| Tunnels | Enabled SSH tunnels through the Tinkla Bastion server for remote access |
| Tesla → Tokens | Showed car authentication tokens (security researcher use) |
| Ludi | Added motor temperature and power graphs to the IC display |
| Misc → VLow / IC SS / CID SS | Set air suspension very low; emailed screenshots of IC or CID |
| Advanced → Dev / Fact / Unlock / Kill | Developer mode, factory mode, diagnostic port unlock, kill staged OTA updates |
| Custom | User-defined menu items from /home/pi/.tinkla/your_commands.json |
The Buddy also exposed a web application at http://10.5.5.1 over its WiFi access point (SSID: tinklaAP, default password: teslaFr33, default login: 1234). This interface handled configuration that could not be done through the on-screen menu: WiFi AP password changes, token persistence settings, SSH tunnel management, and subscription renewal via PayPal.

Direct SSH access used ssh pi@192.168.90.69 from a device connected to the Buddy's LAN port (set laptop IP to 192.168.90.101/24).
Relay control
The Buddy could drive USB relay boards (up to 4 or 8 channels) via the usbrelay command. Relay states were triggered through custom menu entries in your_commands.json. This let owners control accessories — HDMI input switches, auxiliary audio — from the MCU1 touchscreen without running separate wiring to physical switches.
Software versions
The Buddy ran its own firmware separate from openpilot. Notable versions:
- v1.20 — LIN-based steering wheel button trigger for older cars; brightness control fix
- v1.22 — Full networking stack redesign; Buddy could be placed between IC/MCU or MCU/APE; auto-detection of MCU type and AP hardware generation
- v1.25 — MCU1/MCU2 auto-detection; AP hardware auto-detection; Vitals checking disabled by default
- v1.27 — Boot without IC or CID connected; IC state detection to reduce QtCar restarts
- v1.33 — Remote cron capabilities for running scripts on CID periodically
- v1.37 — MCU1 vs MCU2 detection fixes; LIN-based sound triggering on CID
- v1.44 — Tesla software 2020.36.3.1 compatibility; WiFi client mode; relay control from Tinkla Menu (last known release, built November 2022)